Unlock the Tangy Treasure: Your Guide on How to Make Pickled Garlic at Home
Are you a fervent garlic aficionado constantly seeking innovative ways to savor and extend the life of this pungent powerhouse? If so, then embarking on the journey of pickling garlic is an adventure you won't regret! Pickled garlic transforms humble cloves into a burst of tangy, savory flavor, perfect for elevating everything from salads and sandwiches to charcuterie boards and pasta dishes. Far from being a mere novelty, learning
how to make pickled garlic at home is an incredibly rewarding process, yielding a versatile ingredient that's both delicious and long-lasting.
This comprehensive, step-by-step guide will demystify the art of pickling garlic, ensuring even first-time picklers can achieve perfectly tangy, firm cloves. We’ll cover everything from selecting the freshest produce to sterilizing your jars and crafting the ideal brine, along with expert tips to enhance your pickling prowess.
Why Pickled Garlic Deserves a Spot in Your Pantry
Beyond its incredible flavor, pickled garlic offers a host of benefits that make it an essential pantry staple. It's more than just a preservation method; it's a flavor enhancer and a clever way to keep fresh produce at its peak long after harvest.
*
Extended Shelf Life: Pickling is a time-honhonored preservation technique, allowing fresh garlic to remain delicious and safe to eat for several months, often up to a year, when stored correctly. This is a significant advantage over raw garlic, which has a much shorter lifespan.
*
Enhanced Flavor Profile: The magic of vinegar and other brine ingredients mellows garlic's raw intensity, creating a delightful balance of tang, subtle sweetness, and savory depth. It retains garlic's characteristic punch but with a smoother, more palatable edge that makes it enjoyable straight from the jar.
*
Nutrient Retention: While pickling does alter some nutrient profiles, pickled garlic still retains many of the beneficial compounds found in its raw counterpart, including allicin, which is known for its health benefits.
*
Versatility in the Kitchen: These tangy cloves are incredibly adaptable. Mince them into vinaigrettes, slice them into sandwiches, chop them into marinades, or even enjoy them whole as a zesty snack. The possibilities are endless.
*
Digestibility: For some, the raw pungency of garlic can be hard on the stomach. The pickling process can make garlic easier to digest, thanks to the breakdown of certain compounds and the beneficial bacteria that can develop in some pickling methods (though this recipe focuses on a quick, acidic pickle rather than fermentation).
Gather Your Arsenal: Ingredients and Essential Equipment
Before you dive into the pickling process, ensuring you have the right tools and freshest ingredients is paramount. Quality inputs directly translate to delicious outputs.
Selecting the Perfect Garlic
The foundation of exceptional pickled garlic begins with high-quality, fresh cloves. Look for:
*
Firm, Unblemished Heads: Choose garlic heads that are plump and firm, free from any soft spots, bruising, or mold.
*
Tight Cloves: The papery skin should be intact and snugly wrapped around the cloves, indicating freshness. Avoid heads where the cloves feel loose or have begun to sprout green shoots, as this can indicate older garlic.
*
Uniform Size: While not strictly necessary, selecting cloves of similar size can help them pickle evenly and look more aesthetically pleasing in the jar.
The Essential Toolkit
*
Glass Jars with Tight-Fitting Lids: Canning jars (pint or half-pint are ideal) are perfect. Ensure lids are new for the best seal if you plan for longer storage.
*
Large Pot: For preparing the brine solution.
*
Cutting Board & Sharp Knife: For prepping the garlic. A garlic peeler can also be helpful.
*
Measuring Spoons and Cups: For precise brine ingredient ratios.
*
Ladle & Funnel: To safely transfer hot brine into jars.
*
Paper Towels: For drying garlic.
*
Oven (or large canning pot): For sterilizing jars.
Brine Ingredients Breakdown
The brine is the heart of your pickled garlic, imparting flavor and ensuring preservation.
*
Vinegar: The star of the show. White vinegar is a classic choice for a clean, sharp tang. Apple cider vinegar offers a fruitier, milder acidity, while red wine vinegar adds a deeper, more robust flavor and a lovely hue. You can even experiment with a blend!
*
Water: To dilute the vinegar and create the right acidity balance.
*
Salt: Essential for preservation and flavor. Use canning and pickling salt, which is free of anti-caking agents that can cloud your brine.
*
Sugar: A touch of sugar balances the acidity of the vinegar, rounding out the flavor profile.
*
Spices (Optional, but highly recommended!): This is where you can truly customize your pickled garlic. Consider black peppercorns, bay leaves, dill weed, red pepper flakes for heat, mustard seeds, or even a sprig of fresh rosemary or thyme.
Your Step-by-Step Guide on How to Make Pickled Garlic
Now for the exciting part – transforming those raw cloves into tangy delights!
1. Prepare the Garlic: Peel, Soak, and Blanch
This initial step is crucial for both cleanliness and optimal texture.
*
Peel Your Cloves: Separate the garlic heads into individual cloves. The easiest way to peel a large quantity is to place them in a bowl, cover with hot (not boiling) water for 10-15 minutes, then drain and the skins should slip off easily. Alternatively, a small sharp knife or a silicone garlic peeler works wonders. Avoid crushing the cloves as you peel them to maintain their shape.
*
Cold Water Soak (Optional but Recommended): After peeling, place your cloves in a bowl of cold water for about an hour. This helps soften them slightly and removes any lingering bitterness or dirt. Drain thoroughly and pat completely dry with paper towels. Excess water can dilute your brine.
*
Consider Blanching: For an even milder flavor and to potentially prevent the dreaded blue garlic phenomenon (more on that later), some recipes recommend blanching the peeled garlic. Briefly boil the cloves in water for 30 seconds, then immediately plunge them into an ice bath to stop the cooking. Drain and pat dry. This step can soften the garlic further and reduce its raw bite.
2. Sterilize Your Jars for Safety
Sterilization is non-negotiable for food safety and preventing spoilage.
*
Wash Thoroughly: Wash your glass jars and lids (bands and new flats) in warm, soapy water. Rinse completely to remove all soap residue.
*
Oven Sterilization: Place the washed jars upside down on a clean oven rack lined with parchment paper. Heat in a preheated oven at 250°F (120°C) for at least 15 minutes. Keep them in the warm oven until ready to fill to maintain sterility. Alternatively, you can sterilize them by submerging them in boiling water for 10 minutes. Keep lids and bands in very hot (not boiling) water until ready to use.
3. Craft the Perfect Brine Solution
The brine is where the magic happens, infusing flavor and preserving your garlic.
*
Combine Ingredients: In your large pot, combine 2 cups of vinegar (your choice!), 2 cups of water, 1 tablespoon of pickling salt, and 1 teaspoon of sugar. If you're adding whole spices like peppercorns, bay leaves, or mustard seeds, add them now.
*
Heat Gently: Heat the mixture over medium heat, stirring occasionally, until the salt and sugar have completely dissolved. It's crucial not to bring the brine to a rolling boil; just bring it to a simmer.
*
Cool Down: Allow the brine to cool completely before pouring it over your garlic. Pouring hot brine over cold garlic can sometimes result in a less firm texture.
4. Pack, Pour, and Seal Your Pickled Garlic
You’re almost there! This is the final assembly stage.
*
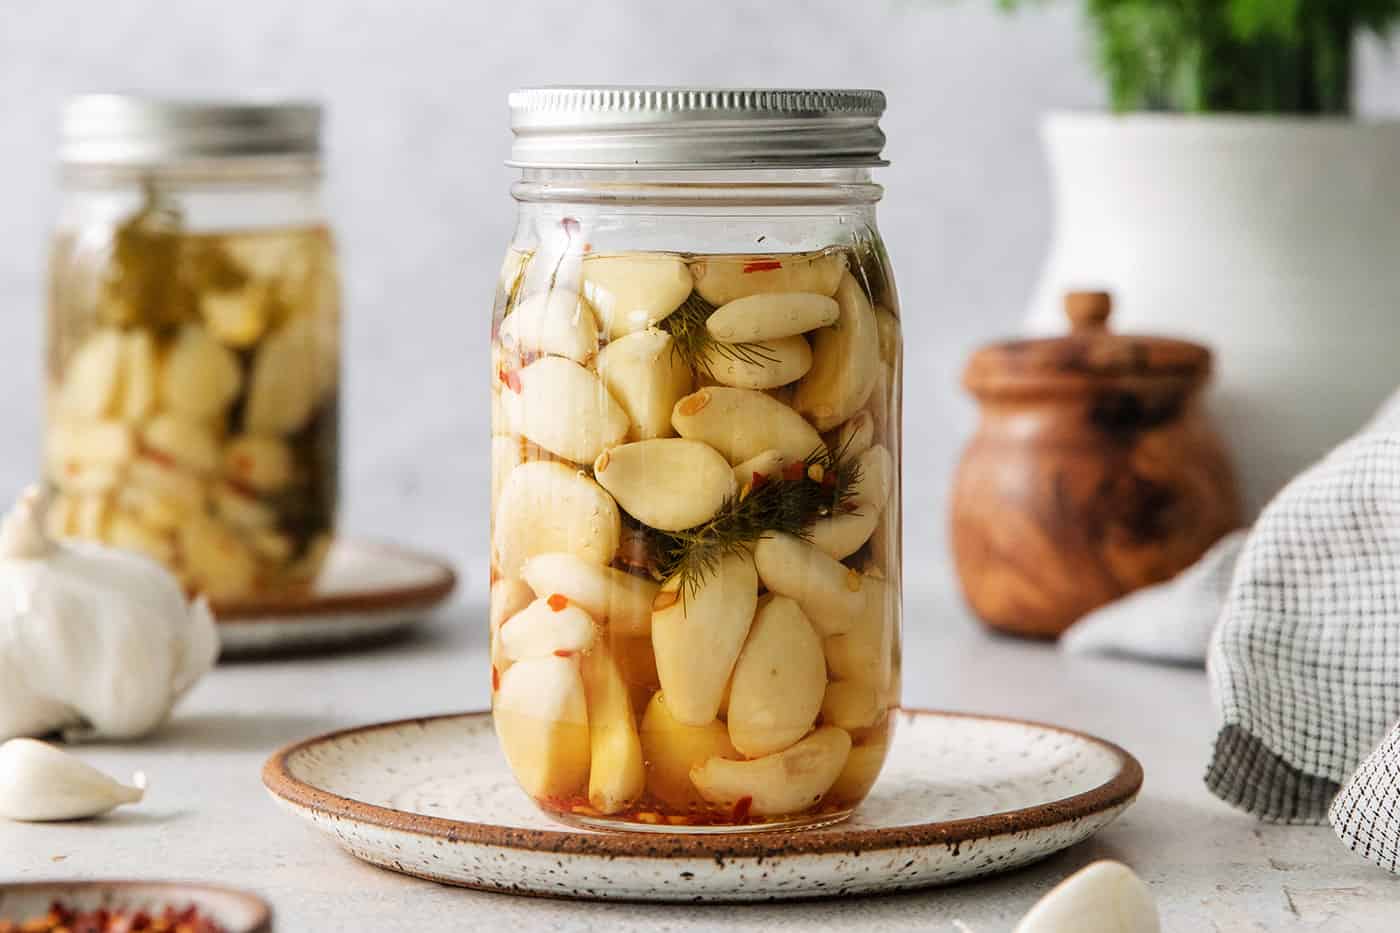
Pack the Jars: Carefully transfer your prepared garlic cloves into the sterilized jars. Pack them relatively tightly but without crushing, leaving about ½ inch of headspace from the rim. If using fresh herbs like dill sprigs or rosemary, add them into the jars with the garlic now.
*
Pour the Brine: Using a funnel and ladle, slowly pour the cooled brine over the garlic cloves, ensuring they are completely submerged. Maintain that ½ inch of headspace.
*
Remove Air Bubbles: Gently tap the jars on the counter or use a clean, non-metallic utensil (like a chopstick or small spatula) to release any trapped air bubbles. Add more brine if necessary to maintain headspace.
*
Wipe Rims & Seal: Wipe the rims of the jars clean with a damp paper towel. Center the clean lids on top and screw on the bands until finger-tight.
*
Process (Optional for Longer Storage): For shelf-stable pickled garlic that can be stored outside the refrigerator, you would typically process the jars in a boiling water bath canner. However, for quick pickles meant for refrigeration, this step is not strictly necessary. This recipe yields delicious refrigerated pickled garlic. For detailed instructions on safe water bath canning for longer preservation, you might find
Homemade Pickled Garlic: Preserve Fresh Cloves for Enhanced Flavor a valuable resource.
Tips for Success and Flavorful Variations
Making pickled garlic is an art form that offers endless possibilities for customization.
*
The Waiting Game: Patience is key! While you can technically eat your pickled garlic after a day or two, the flavors truly meld and develop after at least one week, ideally two to four weeks. Mark your jars with the date to keep track.
*
Storage & Shelf Life: Store your sealed jars of pickled garlic in the refrigerator. Properly stored, they can last for several months, often up to six months or even longer. Always use a clean utensil when removing cloves to prevent contamination.
*
Unleashing Your Inner Chef: Flavor Customization:
*
Spicy Kick: Add dried red chili flakes or a small whole dried chili pepper to your brine or jars.
*
Herbal Infusion: Experiment with sprigs of fresh rosemary, thyme, or oregano in the jars.
*
Citrus Brightness: A strip of lemon or orange peel (remove any white pith) can add a zesty note.
*
Sweet & Sour: Increase the sugar slightly for a sweeter pickle, or add a pinch of pickling spice blend.
*
The Blue Garlic Phenomenon: Don't be alarmed if some of your pickled garlic turns blue or greenish! This is a harmless chemical reaction, often due to enzymes in the garlic reacting with trace amounts of copper or sulfur compounds. The garlic is still perfectly safe to eat and delicious. Blanching the garlic briefly before pickling can sometimes help prevent this.
Embrace the joy of preserving and enhancing one of nature's most flavorful ingredients. With this guide, you now know precisely
Master Pickled Garlic: Your Guide to Flavorful & Long-Lasting Cloves.
Conclusion
Mastering
how to make pickled garlic at home is a rewarding culinary skill that opens up a world of flavor and convenience. With fresh garlic, a simple brine, and a little patience, you can create a versatile, tangy condiment that will impress your taste buds and elevate countless dishes. So gather your ingredients, follow these steps, and prepare to enjoy the irresistible tang of homemade pickled garlic!